Centre for Functional Materials (CFM)
Service Platform
The Director
Centre for Functional Materials
Vellore Institute of Technology
Vellore-632014. Tamil Nadu, India.
Email: cfm@vit.ac.in
Contact:0416-220-2350
Prof. Amlan Das
(Professor Incharge)
Contact: 8456805997
Payment Details
| Studies | Make and Model | Charges (/sample) | In-charge |
| Vicker’s andKnoop hardness | Mitutuoyo-HB210 | Rs. 500 /- | Dr. R Ezhil Vizhi |
| Z-Scan | Coherent 640 OBIS | Rs. 500 /- | Dr. R Ezhil Vizhi |
| Laser DamageThreshold | Litron Lasers He-Ne Laser-632nm | Rs. 500 /- | Dr. Amlan Das |
| Laser ShockPeening | Litron Lasers | Rs. 1000 /- | Dr. Amlan Das |
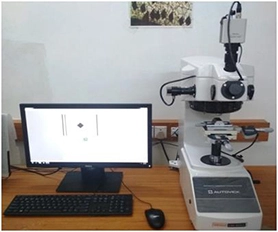
Vicker’s and Knoop hardness Studies
It will be operated by putting a controlled force on the surface of the material over a period of time. After a particular indenter is pressed into the surface under testing, the indentation resulting from it is measured and the software is also used to analyze and generate precise results.
Specifications:
Make and Model: Mitutuoyo-HB210
Indent : Diamond Indenter
Magnification : 10x and 50x
Load : 10 to 1000 kgf (load applied for 10 to 15 seconds)
Vicker’s hardness and Knoop Hardness with AVPAK software
Contact person: Dr. R Ezhil Vizhi, CFM, VIT Vellore
Sample Preparation
For a high-accuracy measurement, the test should be performed on a flat specimen with a polished or prepared surface. The quality of the required surface is dependent on the force used. In all tests, the indentation perimeter and depth should be clearly defined when observed by the microscope.
Charges per sitting (1- 2 hrs): Rs. 500 /- per sample
Z-Scan Technique
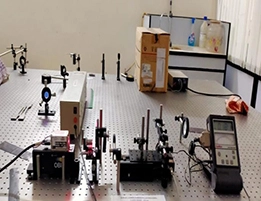
Z-scan technique is used to measure the nonlinear optical properties of materials. The Z-Scan helps to determine intrinsic photo-physical properties of materials by focusing a single laser beams onto the surface of the materials sample. Usually, measurements need to be taken at different laser pulse energies or different laser pulse lifetimes in order to determine what nonlinear processes are present.
Specifications:
Laser Made : Coherent 640 OBIS
Laser wavelength : 640 nm
Software : Coherent connections
Z- Scan controller unit made: Holmarc
Maximum output power: 44 mW
Contact person: Dr. R Ezhil Vizhi, CFM, VIT Vellore
Sample Preparation
Sample (of size 1mm x 1- 10 mm x 1-10 mm) should be flat with a polished surface.
Charges per sitting (1 hrs): Rs. 500 /- per sample
Laser Damage Threshold
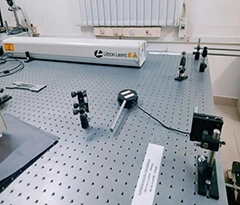
The laser damage threshold (LDT) or laser induced damage threshold (LIDT) is the limit at which an optic or material will be damaged by a laser given the fluence (energy per area), intensity (power per area), and wavelength. LDT values are relevant to both transmissive and reflective optical elements and in applications where the laser induced modification or destruction of a material is the intended outcome.
Litron Lasers
He-Ne Laser-632nm
Contact person: Dr. Amlan Das, CFM, VIT Vellore
Sample Preparation
Sample (of size 1mm X 1- 10 mm X 1-10 mm) should be flat with a polished surface.
Charges per sitting (1 hrs): Rs. 500 /- per sample
Laser Shock Peening Setup
“A process of materials that induces residual compressive stresses on the surface of a component due to shock waves produced by plasma’. Laser peening (LP), or laser shock peening (LSP), is a surface engineering process used to impart beneficial residual stresses in materials. Laser peening uses the dynamic mechanical effects of a shock wave imparted by a laser to modify the surface of a target material. Fundamentally, laser peening can be accomplished with only two components: a transparent overlay and a high energy pulsed laser system. The deep, high-magnitude compressive residual stresses induced by laser peening increase the resistance of materials to surface-related failures, such as fatigue, fretting fatigue and stress corrosion cracking.
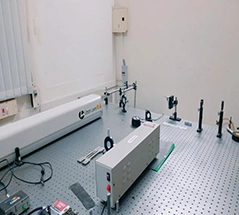
Litron Lasers
Nd-YAG Laser
Energy – 400 mJ
Laser Wavelength – 1064nm
Pulsed duration – 6ns
Contact person:Dr. Amlan Das, CFM, VIT Vellore
Sample Preparation
Metal/metal alloy (1mm thick X 5-20 mm width X 5-20 mm length) with flat surface.
Charges per sitting (1 hr): Rs. 1000 /- per sample
All the rates are inclusive of Service Tax as per Government of India Rules.
- Payment is only through online mode. No DD/Cheque is accepted.
- Please send the printed online fee receipt along with the payment details form.
- Reports will be released only when full payment is received.
- Radioactive/Explosive/Unstable samples are NOT accepted for analysis.
- It is mandatory for user of “CFM Facility – VIT, Vellore” to duly acknowledge the facility in all publications of research work, where in the services of the CFM at VIT have been made use of and communicate the same to CFM VIT, Vellore.
*Mode of payment only through online by using the following link and attach the printed receipt along with the Payment Details Form given below
- "Please use the browsers Mozilla Firefox / other browser (except chrome) / mobile device for paying the fee"


